| |
In real life the Class 92 is a complicated beast and as the model tries to represent a large range of the prototypes features it is consequently a bit of a challenge to drive. This page is designed to help you exploit some of the less obvious features.
| Settings and properties available in Surveyor
|
|
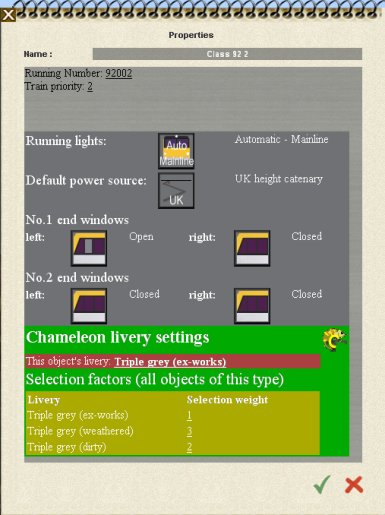
A number of the Class 92 features can be enabled and disabled or adjusted from within Surveyor. To access the properties place a Class 92 in your route then open the properties page by selecting the "?" button on the rollingstock palette then clicking with the righthand mouse button on the loco. The picture to the right shows the Class 92 properties page in Surveyor.
At the top of the page there is the standard field for setting the running number of the loco. By default the Class 92's running number is set randomly from the range of numbers appropriate for the model. If you wish to set a particular number simply click on the number and a dialog box will open where you can enter your desired number. Nameplates and logos will automatically be added to the model as required by the number set.
At the bottom of the panel are the Chameleon settings that control the livery options which by default are selected randomly. By clicking on the text describing the locos livery you can cycle through all the available options. You can also control how likely each livery is to be randomly selected by adjusting the "selection weight" parameters. The higher the number the more likely it will be chosen. A factor of 0 means the livery will never be selected.
|
|
 |
|
The Class 92 also has a number of other party tricks that can be controlled. From the settings panel you can control some of the loco lighting options by clicking on the lights button. By default the lights will be set to automatic control which will illuminate the white marker lights and red tail lights depending on the direction of travel. Alternatively you can elect to control the lights manually from within the cab or set the headlights up to flash as hazard warning lights.
The Class 92 is able to operate from several power supplies, UK height overhead, European height overhead or 3rd rail. You can select the default power supply the loco will use when the pantograph is raised by clicking a button in the Surveyor panel. This default will be overidden by the loco when the pantograph is raised if the loco can find a power source trigger somewhere on the track it is on.
Finally you can also control whether any of the side windows are open or closed at each end of the loco.
|
| Settings and properties available in Driver
|
|
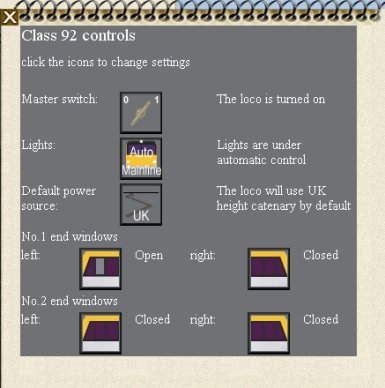
Many of the Class 92 features can also be controlled from the settings panel in Driver. To access this panel right click on the loco (TRS2004) or Ctrl+right click (TRS2006, TC, etc.). The picture to the right shows the Class 92 settings available in Driver.
As with the Surveyor options you can control some of the lighting options from the Driver settings panel. The lights can be switched between automatic, manual or hazard lights.
The default power supply can be selected. By default when the pantograph is raised the loco will raise the pantograph to the correct height for UK catenary. This default can be changed to European height catenary or 3rd rail by clicking the button. This default will be overidden by the loco when the pantograph is raised if the loco can find a power source trigger somewhere on the track it is on.
The settings panel also allows control of whether any of the side windows are open or closed at each end of the loco.
|
|
 |
 |
|
The custom cab provided with the class 92 has a wide range of working controls and provides prototypical operation of many capabilities such as the braking system, the ability to switch between UK and European gauge readings and multiple working facilities. Direct brake, auto train brake (PBL), parking brake and emergency brake controls are all operational.
The master switch, drivers key, power lever and AWS reset buttton are mounted on the central control stand and again provide prototypical operation. Also mounted on the central pedestal is the AWS reset button.
|
|
The main dashboard contains a whole array of control and includes some Class 92 specials such as the Euro/UK mode switch, ribbon speedo, speed limiter and power source switch. They all work prototypically.
Independant controls for the windscreen wipers for both the driver and 2nd man are provided and include the ability to set variable rate interval wipe. The 2nd man also has duplicate controls for horn and emergency brake.
|
|
The rendering of the cab is affected by the exterior lighting conditions and the dials are correctly illuminated for operation during darkness. Warning lights are provided for a number of conditions on the central panel. If it's too dark of course you can always turn on the cab interior lights which are controlled, along with a number of other things such as the locos exterior lights, from the panel above and to the left of the driver's head.
The horn lever works in a similar manner to the prototype, pushing forward for high tone back for low, but there are limitations due to the audio capabilities of TRS.
|
|
 |
|
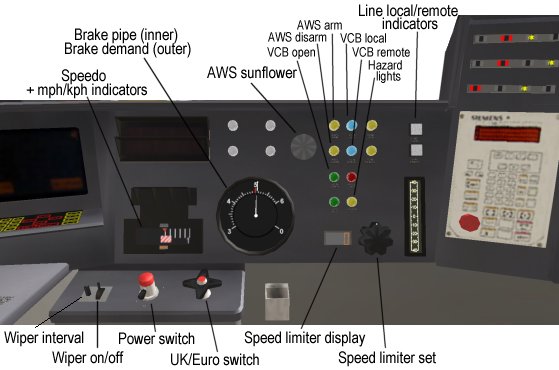
Directly in front of the driver are a whole bunch of controls and dials. Most obvious amongst these is the combination brake pipe and brake demand gauge. The inner needle shows the current brake pipe pressure in bar. Around the outside runs a brake demand indicator that displays the brake pipe pressure the driver has requested via the PBL lever.
To the left of the brake pressure gauge is a ribbon style speedo that displays in either mph or kph depending on the setting of the UK/Euro switch. Immediatley above an below the speedo are indicator lights that show whether the reading is mph or kph.
On the left of the small panel below the speedo there are controls for the driver's windscreen wiper, off/interval/continuous toggle switch and rotary interval delay. In the centre of the panel is the power switch which has 4 positions, off (6 o'clock), overhead (7 o'clock), off (12 o'clock) and 3rd rail (1 o'clock). To the right is the UK/Euro switch which sets the mode of the speedo, limiter etc.
|
|
|
To the bottom right of the main panel is a digital display that shows the current speed limiter setting which is adjusted in 5 mph or kph steps using the large knob. If the limiter is set to zero it is disabled and the driver has full control of the loco speed.
Directly above the limiter is an array of pushbuttons that control various capabilities. The hazard light pushbutton causes the headlamps to flash alternately at this end of the loco. There are also buttons to arm and disarm the AWS system. The AWS sunflower visual warning is situated to the left of the button array.
In the button array are a set of controls that operate the Vacuum Circuit Breaker (VCB) which disconnects traction power when opened and so effectively disables the loco. The VCB open button will open the VCB of this loco and any other Class 92 in the train. The VCB local button closes the VCB on this loco restoring power. Similarly the VCB remote button will restore power to any helper Class 92 loco in the train.
|
|
To the far right of the main panel is a central binnacle with a whole bunch of warning lights that reflect certain loco states.
To the right of the driver's seat is a central control stand which houses the throttle, main switch (reverser), AWS reset button and the driver's master key. The latter controls whether the loco is usable or not. Turning the loco off with the master key will switch off the electronic displays and warning lights and disable the loco.
The AWS reset button is used to acknowledge AWS warnings of red signals. Pressing the button will turn of the AWS warning horn and blank the AWS sunflower display. The reset button needs to be used when the loco is initially started up as the AWS will sound to test it is operating corrrectly.
|
 |
|
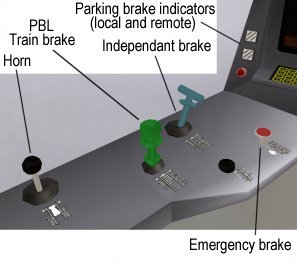
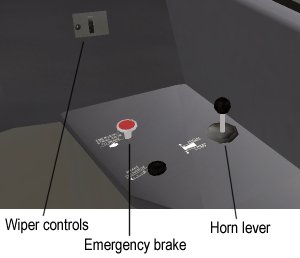
To the left of the driver's seat is a control console which houses the brake and horn controls. Furthest forward is an emergency brake plunger. Push this and there will be a full service brake application.
The blue "T" bar handle is the independent brake contol that allows you to apply and release the loco brakes. When coupled to a train this control is usually left in the forward release position.
|
 |
|
The green handle is the train brake or PBL lever. This is a French-style brake control which doesn't directly control the train brakes but allows the driver to set a desired brake pipe pressure which is displayed by the outer needle on the brake pipe gauge directly in front of the driver. To release the train brakes position the mouse pointer over the lever then click and hold the right mouse button. Gently ease the lever forward and hold it and you will see the brake demand needle rotate clockwise. When the needle reaches the top dead centre positon, 5 bar, release the lever and the brakes will release. To apply brakes ease the brake lever back until the desired brake pipe pressure is indicated by the outer needle.
To the rear of the console is the control which can be used to sound the high or low horns.
|
 |
|
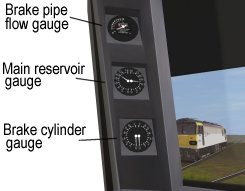
To the left of the driver in the window pillar are mounted 3 gauges. From bottom to top these are the brake cylinder gauge showing the pressure in the brake cylinders on each bogey. Above this is the Main reservoir gauge and at the top the brake pipe flow gauge which gives an indication as to whether the brakes have release throughout the train. The pipe flow gauge has a red marker needle which you can adjust to your preference.
If the cab air conditioning is not to your liking you can slide open the central side window on both the driver and 2nd man's side of the cab. If the sun shines in your eyes you can pull down the sun visor.
|
|
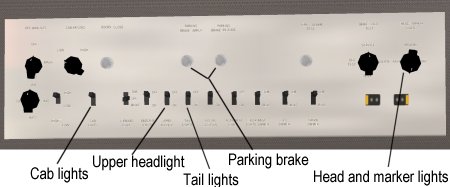
Above the driver's head is a panel with a number of key controls. In the center of the panel are a pair of pushbuttons used to apply and release the loco parking brake.
The upper central headlight is independantly controlled via a toggle switch as are the red tail lights. The only other of the long line of toggle switches that is operational is the cab light switch to the far left.
To the far right of the panel is a rotary switch which controls the main headlights and marker lights. You can select off, yard work (marker lights only), day or night light configurations.
|
 |
|
The 2nd man has a set of duplicate controls on a console to the right of the seat. There is an emergency brake plunger which operates in the same manner as the driver's and also a horn control.
In front of the 2nd man on the main control panel are the controls for the righthand windscreen wiper. A rotary interval set control and a 3-position wiper toggle switch are provided.
|
|
 |
|
