Script support for PikkBird's "bluestar" coupling system
CoupleStar allows your model to support the "bluestar" coupling protocol defined by PikkaBird. Any model that supports Pikka's bluestar standard should couple and connect brake hoses with models by other creators that also support bluestar. All credit for the bluestar standard goes to PikkaBird and thanks go to him for allowing the use of it.
To display the different coupler and hose states CoupleStar uses a set of coupler and hose meshes that are attached to designated attachment points on the model in the right combinations. A number of appropriate coupler and hose meshes are available on the Auran Trainz DLS or the model maker can use their own creations.
Your model will require an attachment point for the couplers in the centre of each buffer beam or end plate and you will need to raise this to the appropriate height in the front/back or left/right views. For the couplers produced by Eldavo's Railway Emporium and available from the Trainz DLS, the attachment point is in the centre of the coupler where it meets the buffer beam.
Similarly you will need attachment points for any brake, reservoir, or vacuum hoses. Again for the Eldavo created examples the attachment point is in the centre of the object where it meets the main model. If you wish to use a rear lamp such as Pikka's excellent flashing battery lamp you will need attachments for these. The names of the attachment points in your model are not significant as the config.txt file will map these names to the effect names that the script will use.
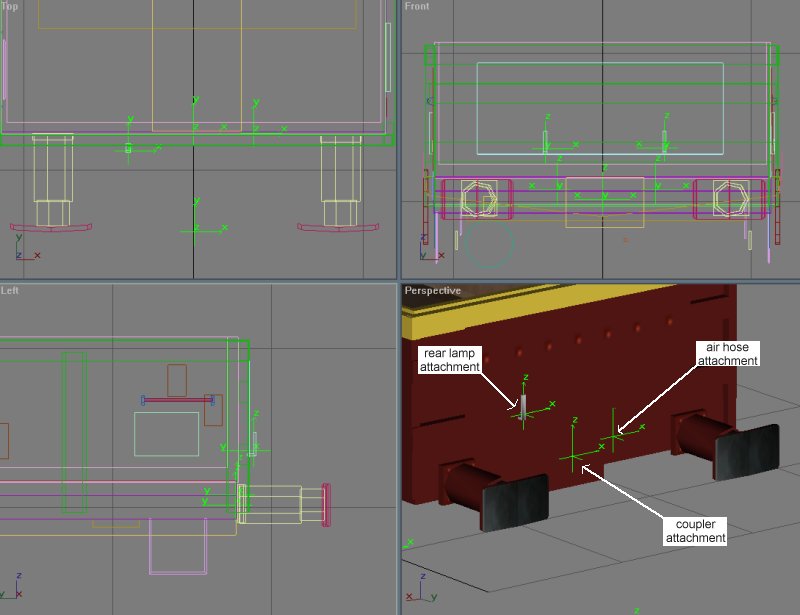
The following illustration shows a model in GMax with its attachments for standard drawbar mounted couplers, air brake hoses, and rear lamps. If your model has air brake reservoir hoses and/or vacuum hoses then you will require more attachments than are shown here.
trainz-build 2.4
Your model config.txt will need to declare the mesh assets that will be used for couplers, hoses, and rear lamps in the kuid-table section. This will help the Download Helper to retrieve all the dependancies when people download your model and also is the way the CoupleStar library identifies the objects. The names are significant, note they all start with "CoupleStar_".
You must declare the need for the CoupleStar library asset itself otherwise your vehicles script will not be able to find it and folks may not download it! This is achieved with the CoupleStar_library entry.
You need to definine the coupler meshes you wish to use, which are named CoupleStar_coupler_coupled, CoupleStar_coupler_stowed, and CoupleStar_coupler_hanging. For a screwlink, 3 link, or instanter coupling equipped vehicle you will need all three entries. In the case of these coupler types you can use hanging model for the stowed version. See the later section on coupler types for more information. For each type of hose your model uses you will need to define a mesh asset for the coupled version and the hanging/unused version. If you are using a rear lamp, define a mesh here as well.
The final two entries in the example below define the corona used by Pikka's lamp , a dependancy of the lamp mesh, and the bluestar icon. The icon is optional and you may omit it if you wish.
kuid-table {
	.
	.
	CoupleStar_library			<kuid2:75134:99002>
	CoupleStar_coupler_coupled		<kuid2:75134:15012>
	CoupleStar_coupler_stowed		<kuid2:75134:15015>
	CoupleStar_coupler_hanging		<kuid2:75134:15014>
	CoupleStar_airhose_hanging		<kuid2:75134:15006>
	CoupleStar_airhose_coupled		<kuid2:75134:15008>
	CoupleStar_lamp				<kuid:2512:9>
	.
	.
	lampcorona				<kuid:2512:8>
	icon3					<kuid:2512:5>
}
If you wish to display Pikka's bluestar icon with your model in the vehicle selection dialog add an icon reference
like so:
icon3 <kuid:2512:5>
Next you need to add bluestar coupler and brake definitions to tell the script what sort of attachments it needs
to look for and use when your vehicle couples.
bluestar_coupler			"50"
bluestar_brake				"4"
The bluestar_coupler options are as follows:
	10		Simple coupler hook
	11		Coupler hook with a hingeable buckeye/auto coupler
	20		Drawhook with 3 link coupler
	30		Drawhook with instanter coupler
	40		Drawhook with screwlink coupler and buckeye/auto coupler
	50		Drawhook with screwlink coupler
	60		Buckeye/auto coupler
The bluestar_brake options are:
	1		No brake pipes
	2		Vacuum brakepipes mounted below the bufferbeam
	3		Vacuum brakepipes mounted above the bufferbeam
	4		Air brake pipes
	5		Air brake and vacuum brake pipes
Now define the script class for your model. The name of the class is entirely of your choosing but must match up
with the filename of the file in which the source code is saved.
class						"CSExample"
script						"CSExample"
Finally we need some mesh-table entries to define the attachment points for the couplers and hoses. The names are significant and end with either "_a" for attachments at the front or "_b" for those at the read. Therefore coupler_a defines the attachment point for the front coupler and coupler_b defines the attachment point for the rear coupler. For each entry the "a.xxxx" name is the name of the Point Helper in the GMax model.
mesh-table {
	default {
		effects {
			coupler_a {
				kind		attachment
				att		a.couplerA
			}
			coupler_b {
				kind		attachment
				att		a.couplerB
			}
			airhose_a {
				kind		attachment
				att		a.hoseA
			}
			airhose_b {
				kind		attachment
				att		a.hoseB
			}
			lamp_a {
				kind		attachment
				att		a.lampA
			}
			lamp_b {
				kind		attachment
				att		a.lampB
			}
		}
	}
}
include "vehicle.gs"
include "library.gs"

/*
   CSExample - CoupleStar usage example

   Author: Dave Renshaw (eldavo)

   Copyright Dave Renshaw 2005. All rights reserved.

 */

class CSExample isclass Vehicle
{
    void CouplingHandler(Message msg);

    Library couplestar;

    void Init(void) {
        inherited();

        couplestar = World.GetLibrary(GetAsset().LookupKUIDTable("CoupleStar_library"));
        if (couplestar) {
            GSObject[] objectParam = new GSObject[1];
            objectParam[0] = me;
            // Set up the initial couplers and hoses...
            couplestar.LibraryCall("SetInitialCouplers", null, objectParam);
        }

        AddHandler(me, "Vehicle", null, "CouplingHandler");
    }

    void CouplingHandler(Message msg) {
        if (couplestar) {
            GSObject[] objectParam = new GSObject[2];
            objectParam[0] = me;
            objectParam[1] = msg.src;
            string[] stringParam = new string[2];
            stringParam[0] = msg.major;
            stringParam[1] = msg.minor;
            couplestar.LibraryCall("HandleMessage", stringParam, objectParam);
        }
    }
};
The SetInitialCouplers function is called from the Init method of the vehicle script to set up an initial set of couplers and hoses. The function takes one parameter, a reference to the vehicle itself. If all is well the function returns the string "OK". In the example below the return string is used to decide whether we should set up a handler to listen for messages telling us when the vehilce couples and uncouples from others.
Example:
void Init(void) {
	inherited();

	GSObject[] objectParam = new GSObject[1];
	objectParam[0] = me;
	if (couplestar.LibraryCall("SetInitialCouplers", null, objectParam) == "OK") {
		AddHandler(me, "Vehicle", null, "CouplingHandler");
	}
}
The HandleMessage function is called to allow CoupleStar to respond to coupling and uncoupling messages. The function takes two object parameters: a reference to the vehicle itself, and a reference to the object that sent the message from the msg object. In addition the function takes two string parameters: the major and minor message identities.
Example:
void CouplingHandler(Message msg) {
	GSObject[] objectParam = new GSObject[2];
	objectParam[0] = me;
	objectParam[1] = msg.src;
	string[] stringParam = new string[2];
	stringParam[0] = msg.major;
	stringParam[1] = msg.minor;
	couplestar.LibraryCall("HandleMessage", stringParam, objectParam);
}
The CheckConfig function can be used when testing your model to have the CoupleStar library analyse the config.txt file of your model and to check whether it can successfully animate the couplers and hoses. You should not leave calls to this function in your script once you are happy with the model as it is a fairly expensive function to call in terms of CPU.
Example:
	GSObject[] objectParam = new GSObject[1];
	objectParam[0] = me;
	couplestar.LibraryCall("CheckConfig", null, objectParam);
This function is automatically called as part of the SetInitialCouplers function when you examine the model in Railyard so in most cases you don't need to use this function. If somebody has problems with your model simply ask them to look at it in Railyard and then have them send you the JetLog.txt file. The following is an example of the output you might expect to see in the log file:
   : MOA bogie open box wagon (kuid2 75134 15038 1) Copyright Dave Renshaw (Eldavo's Railway Emporium) 2005
   : CoupleStar coupling handler v0.9a. Copyright Dave Renshaw (Eldavo's Railway Emporium) 2005
   : -----------------------------------------------------------------------------------------------
   : | CoupleStar coupling handler v0.9a. Copyright Dave Renshaw (Eldavo's Railway Emporium) 2005
   : |
   : | Checking config.txt for MOA bogie open box wagon 1 kuid '
   : |  instance id is '3'
   : |
   : | Checking bluestar entries in config.txt...
   : | bluestar_coupler     50  (drawhook with screwlink coupler)   OK.
   : | bluestar_coupler      4  (air brake hose)   OK.
   : |
   : | Checking kuid-table entries in config.txt...
   : | CoupleStar_coupler_coupled       OK.
   : |
   : |   **ERROR** No asset found for 'CoupleStar_coupler_stowed' in config.txt kuid-table!
   : |   No coupling animations will be performed for this vehicle.
   : | CoupleStar_coupler_hanging       OK.
   : | CoupleStar_airhose_hanging       OK.
   : | CoupleStar_airhose_coupled       OK.
   : | CoupleStar_lamp       OK.
   : |
   : | Checking mesh-table entries in config.txt...
   : | Front coupler will be attached to mesh attachment coupler_a(a.couplerA) OK.
   : | Rear coupler will be attached to mesh attachment coupler_b(a.couplerB) OK.
   : | Front air brake hose will be attached to mesh attachment airhose_a(a.hoseA) OK.
   : | Rear air brake hose will be attached to mesh attachment airhose_b(a.hoseB) OK.
   : | Rear lamps will be attached to mesh attachment lamp_a(a.lampA) OK.
   : | Rear lamps will be attached to mesh attachment lamp_b(a.lampB) OK.
   : |
   : | Checking assets can be created...
   : | CoupleStar_coupler_coupled     OK.
   : | CoupleStar_coupler_hanging     OK.
   : CoupleStar.GetAsset() - *WARNING* can't find mesh asset 'CoupleStar_airhose_coupled'!
   : CoupleStar.SetVehicle() [v1.0] my vehicle name is 'MOA bogie open box wagon 1' and id is '3'
   : |
   : |   **ERROR** Unable to access asset 'CoupleStar_airhose_coupled'.  Please ensure  has been downloaded.
   : |   No coupling animations will be performed for this vehicle.
   : | CoupleStar_airhose_hanging     OK.
   : | CoupleStar_lamp     OK.
   : |
   : | 2 errors found.  Vehicle will NOT operate correctly.
   : -----------------------------------------------------------------------------------------------
The example above shows the output from CoupleStar after examining a vehicle in Railyard. In this case the acript has identified two errors in the configuration and setup. The first error identified is a missing kuid-table entry defining the mesh to be used for the coupler hanging unused. This is required as the vehicle is defined to have a screwlink coupling. The second error suggests that the asset for the coupled airhose is missing from the system. In fact in this case the kuid referenc in the config.txt is wrong which amounts to the same thing, the script can't create an instance of the asset!